Window Casing – Using Pocket Screw Joints
Window Casing – Tight Joints Every Time
So we’ve all seen window casing that looks terrible because the joints have opened up over time. This even happens with the most forgiving joint (the butt and pass joint). This can be totally prevented by pre-assembling your window casing with pocket screws! Using pocket screws is so simple that anyone can do it all you need is a pocket hole jig like the Kreg Jig System.
Step 1 – Cut Window Casing To Length
The first step is to pre-cut all your window casing to size. When I case windows I like to leave a 1/4″ reveal between the inside edge of the casing and the window jamb. This means that the inside dimensions of the casing will be the width and height of the jambed opening plus 1/2″.
For example, measure the horizontal dimension from the inside face of side window jamb to side window jamb, add 1/2″ to that number, then add two times the width of the window casing material. This is the width of the top and bottom pieces of casing. For the vertical legs of the casing measure the vertical distance from the bottom of the top jamb down to the top of the sill. Now add 1/2″ and that is the total length of the two side pieces.
Step 2 – Use Pocket Hole Jig To Pre-Assemble Window Casing
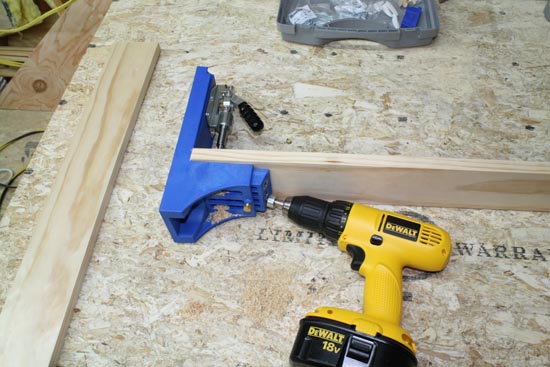
Once the window casing is cut to length you’ll want to use a pocket hole jig like the Kreg Jig shown above. Follow the jig set-up directions for drilling the pocket holes. The jig needs to be set up for the thickness of the wood.
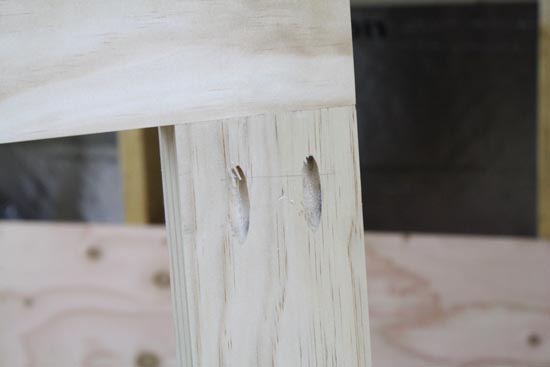
In order to create a strong joint you’ll want to use 2 pocket screws for each joint. It doesn’t really matter a whole bunch which pieces your drill. However, to minimize the risk of splitting I prefer to put the pocket holes in the vertical legs of the window casing. This way the hole is in line with the wood grain as shown above.
Once the holes are drilled you simply clamp the two pieces together and install the pocket screws. This helps clamp the two pieces of window casing together tightly and prevents future opening of the joint.
Step 3 – Nail Pre-Assembled Window Casing to Wall
Finally you can nail the window casing to the wall. Simply line up the casing so the reveal is equal all around the window and nail it in place.
Final Thoughts On Pre-Assembled Window Casing
Most DIY’ers almost always put window casing up one piece at a time. This makes it very difficult to keep the casing square with nice tight joints. If you want to have your work look like a pro you need to learn this trick. Almost every finish carpenter I’ve ever worked with has always pre-assembled door and window casing. It saves time and it looks great!
Recent Posts
Framing Stick Nailer vs Coil Nailer
Which is Better a Stick Nailer or Coil Nailer? Framers have many choices in nailers…
How Many Roofing Nails Per Square of Shingles
Estimating How Many Nails for a New Roof When it comes to estimating materials for…
Composite / PVC Decking – Layout Tips & Advice
Composite / PVC Decking Layout Tips and Advice Composite and PVC decking have really changed…
Benefits of an ERV System (Energy Recovery Ventilator)
Benefits of ERV Systems (Energy Recovery Ventilator) If you're building a new home or doing…
Vermiculite Attic Insulation Abatement
Vermiculite Attic Insulation If your home was built before 1990 there is a chance it…
Nuisance Tripping of AFCI (Arc Fault) Circuit Breakers
Arc Fault (AFCI) Circuit Breakers Tripping Often An arc-fault circuit interrupter (AFCI) or arc-fault detection…


View Comments
Nice simple solution. If you're going with something more decorative like milled mitered casing then I think your best best is Clam Clamp or an older style Hartford clamp, use either with glue and or biscuits. There's also the Mitertite but that thing seems needlessly complicated.