Kitchen Backsplash – Selecting Materials
Selecting Materials For Kitchen Backsplash
We’re going to write a series of article in the coming weeks on how to tile a kitchen backsplash. We’re going to cover everything from choosing materials to installation of an actual tile backsplash. Installing a backsplash in your kitchen is a fairly straight forward DIY project that can add a completely new and fresh look.
Kitchen Backsplashes


Today kitchen backsplashes are made from an infinite list of materials including:
- Porcelain or Ceramic tile
- Natural Stone (granite, marble, slate, etc)
- Metals such as stainless steel
- Decorative paints and/or wall paper
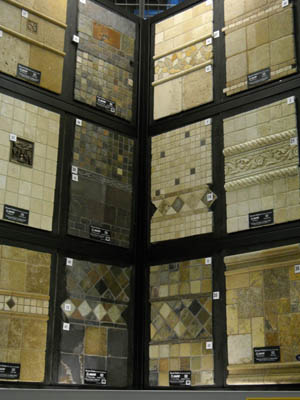
As you can see from the adjacent photo there are endless designs that incorporate all of the above materials. On a recent trip to Lowe’s we looked through dozens of these type of idea boards.
Details About Our Backsplash Project


For this project we’re going to leave the 4 inch granite backsplash in place and add tiles and a decorate accent above it. The reason we’re doing this is purely based on the existing condition. When the house was built the granite fabricator didn’t need to scribe a tight fit to the wall as the granite backsplash covers any gaps. So, if we removed it there’s a very good chance the tile wouldn’t fully cover the gap. In new construction you can order the granite for a tight fit when you know there will be a tile backsplash.
Our Backsplash Design


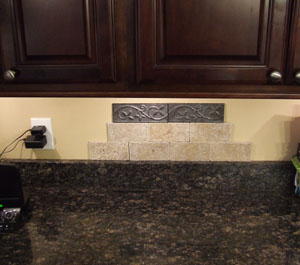
The design that we decided to go with is shown in the adjacent photo. We chose between this layout and a similar one that used small 1×1 tiles and the same accent tile. The small 1×1 tiles seemed too busy for our liking so this is what we’ll be installing.
It consists of 3×6 tumbled marble tiles along with a 3×8 pewter (looking) tile with a decorative design. The tumbled marble closely matches the color of the walls in the kitchen and some of the tan highlights in the granite. The pewter looking accent tiles bring out some of the gray and blue in the granite along with the stainless steel appliances.
Tile Mastic and Grout
For this project we’ll be using a pre-mixed tile mastic instead of thin set. I’ve made this choice for a couple of reasons:
- Thin set adheres to tile and walls much better and creates a better “hold” in vertical applications. This makes setting the tiles on the wall much easier.
- Our backsplash doesn’t see much water as the lower 4 inch tall granite section takes the brunt of wet splashes. In really wet applications I prefer using a thin set product.
- We’re going to install the tiles directly over the painted drywall, mastic works great in this type of application.
As far as grout is concerned I was thinking about using an epoxy grout as they are very easy to use these days. Epoxy grouts are great in kitchens where grease stains can be very unforgiving. However, epoxy grouts can be very difficult to use with unglazed tumbled stone like the marble we’ve chosen. Because of that we’ll use a regular un-sanded cement based grout.
Follow This Project
If you’d like to see the final pictures of our new backsplash along with a summary of all the backsplash articles then visit our complete guide on how to install a kitchen backsplash.
Recent Posts
Framing Stick Nailer vs Coil Nailer
Which is Better a Stick Nailer or Coil Nailer? Framers have many choices in nailers…
How Many Roofing Nails Per Square of Shingles
Estimating How Many Nails for a New Roof When it comes to estimating materials for…
Composite / PVC Decking – Layout Tips & Advice
Composite / PVC Decking Layout Tips and Advice Composite and PVC decking have really changed…
Benefits of an ERV System (Energy Recovery Ventilator)
Benefits of ERV Systems (Energy Recovery Ventilator) If you're building a new home or doing…
Vermiculite Attic Insulation Abatement
Vermiculite Attic Insulation If your home was built before 1990 there is a chance it…
Nuisance Tripping of AFCI (Arc Fault) Circuit Breakers
Arc Fault (AFCI) Circuit Breakers Tripping Often An arc-fault circuit interrupter (AFCI) or arc-fault detection…