How To Install Simple Window Casing
Butt and Pass Window Trim


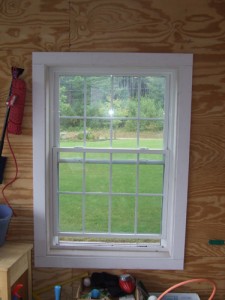
The Butt and Pass method involves butted joints between the top and bottom pieces with the side pieces as shown in the photo. This type of joint will have almost no opening effect due to changes in temperature and humidity unlike miter joints. If you’re interested in learning why miter joints open up then you should read: What Causes Miter Joint Shrinkage.
Measuring & Laying Out Trim
Laying out this type of trim is really easy. For this example I used 3-1/2 inch wide flat stock trim (1×4). Also, the window measures 38-1/2 inch wide and 59-3/4 inch tall (these dimensions are to the outside of the extension jambs).
Typically I like to leave a 1/4 inch to 3/8 inch reveal from the inside edge of the extension jamb to the inside edge of the trim (casing). Calculating the length of the trim pieces is easy now that we have all the dimensions. Once you calculate the lengths you can cut two horizontal pieces and two vertical pieces for each window.
Vertical Trim Pieces = height of window (-) 2 (x) 1/4″ = 59-3/4 inches minus 2 times 1/4 inch = 59-1/4 inches.
Horizontal Trim Pieces = width of window (+) 2 (x) width of trim (-) 2 (x) 1/4″ = 38-1/2 inches plus 2 times 3-1/2 inches minus 2 times 1/4 inch = 45 inches.


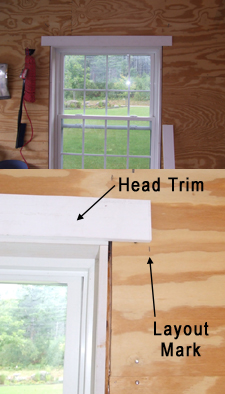
Now that you’ve cut all the pieces to length you need to install the head piece first. Make a mark on the left and right sides of the extension jambs 1/4 inch up from the inside edge. This marks the reveal and helps you line it up before you nail it.
Also put a mark where the ends of the head trim go. For my trim the mark will be 3-1/2 inches minus 1/4 inch or 3-1/4 inches from the outside edge of the extension jambs (see photo).
Center the head piece above the window with the bottom edge on the marks you just made, nail it in place with two nails until the remaining trim is installed.
Install Two Side Pieces Of Trim
Now you can install the two vertical side pieces of trim. Start at the top and align the outside of the trim with the end of the head trim. Nail the top and work down the piece maintaining the 1/4 inch reveal as you go. I only nail half way down the piece until after the bottom piece is installed.
Install the Bottom Piece Of Trim
Now you can install the bottom piece of trim. The trim should butt up tight against the wide pieces. You can also adjust the side pieces to line up flush with the ends of the bottom piece. Now nail all the trim every 12 inches.
Simple Trim Is Sometimes The Best Trim
It’s taken me several years to realize that simple trim is sometimes the best. For this project I was simply trimming out windows in my garage so the application was definitely applicable. However, I’ve seen simple flat trim like this work wonderfully in very beautiful homes. The best part is it’s inexpensive, it looks nice and it performs very well.
Recent Posts
Framing Stick Nailer vs Coil Nailer
Which is Better a Stick Nailer or Coil Nailer? Framers have many choices in nailers…
How Many Roofing Nails Per Square of Shingles
Estimating How Many Nails for a New Roof When it comes to estimating materials for…
Composite / PVC Decking – Layout Tips & Advice
Composite / PVC Decking Layout Tips and Advice Composite and PVC decking have really changed…
Benefits of an ERV System (Energy Recovery Ventilator)
Benefits of ERV Systems (Energy Recovery Ventilator) If you're building a new home or doing…
Vermiculite Attic Insulation Abatement
Vermiculite Attic Insulation If your home was built before 1990 there is a chance it…
Nuisance Tripping of AFCI (Arc Fault) Circuit Breakers
Arc Fault (AFCI) Circuit Breakers Tripping Often An arc-fault circuit interrupter (AFCI) or arc-fault detection…
View Comments
What a great article and site! Looked at several articles and yours is bu far the best. I will be reading my way through your entire site.
Congratulations on your good work!
Great, clear instructions for unskilled DIYers like me. Do you have suggestions for getting good, smooth fits between the joints? e.g. Is it better to cut the trim from the back side or does it matter?
Sharp blade, high number of teeth, cut slow :)
The new houses in our area all have flat casing around windows and doors. It looks like it is one-piece because the joints are so smooth. What magical compound do the carpenters use to cover that joint and then paint over so you can’t see if it is an angle cut or square butt joint?
I am wondering also about filling butt joints on window casing.
Is it ok to leave butt joints unfilled and just see that line?
Absolutely.....like most all trim detailed in this fashion.
Is there a difference in the make of a window using a flat casting instead of shutters on exterior?