Flashing A Deck Ledger Board Properly

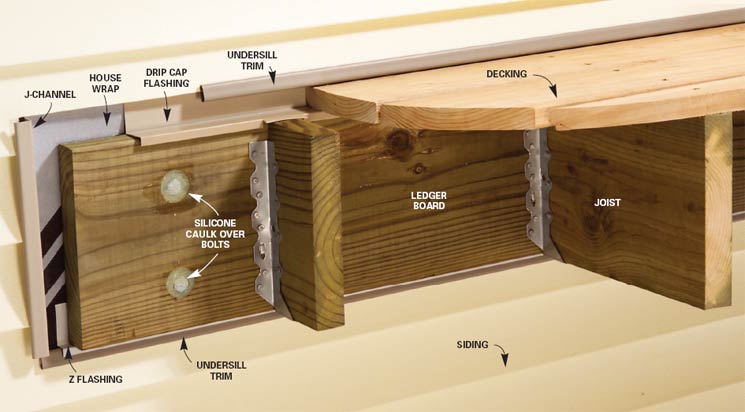
Deck Ledger Board Flashing Detail
Lately I’ve been seeing problematic deck ledger flashing details so I’d like to share with you my perspective on how to properly flash and secure your deck to the house. Properly flashing a deck ledger seems to be a lost skill with most weekend warriors…..let’s discuss how to properly secure the deck ledger and install the flashing.

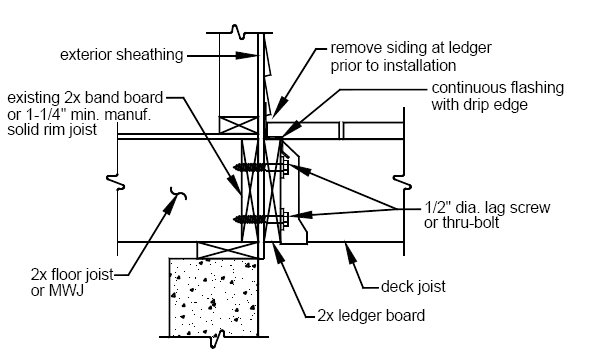
Building a new deck isn’t really that difficult of a project. However, there are some details that must be followed in order to prevent premature failure of your deck and the area of your house that it’s attached to. The problem with attaching a deck to the house is it creates a great area to collect water. The intersection of the house and deck is extremely vulnerable to moisture problems.
As you can see from the diagram and the photo flashing must be done in layers. The best way to think about it to visualize what a drop of water will do as it hits the deck and moves towards the house. First the rain hits the siding, then it gets to the house wrap, then it hits the drip cap flashing and runs out away from the house.
How To Flash A Deck Ledger Board
First I like to install a layer of self adhering bitchathane (we like Grace Ice and Water) behind the ledger and above it by at least 12 inches. Make sure the bitchathane is behind the house wrap. The house wrap should extend and overlap the bitchathane.
Next mark the location of the bottom of the ledger board and install a small piece of z flashing. When I bolt the ledger board to the house, I like to install 3 or 4 flat washers between the house and the ledger to allow water and moisture to escape and not get trapped. I’d also like to point out that I prefer bolts to lag screws. The reason is lag screws don’t hold very well when then only penetrate and inch or so into the rim joist. Make sure you seal all around the bolt heads with some silicone caulking as another line of defense against water.
Next you’ll want to install a piece of metal drip cap flashing above the ledger board. When you install the floor joists you’ll need to make some small cuts in the flashing to allow the top of the joist to line up with the top of the ledger board. Make sure the house wrap is long enough to cover over the top of the drip cap. (This is a bit different than the photo.) If there is already house wrap on, then cut a slit in the house wrap just above the top of the ledger. That way you can slide the drip cap up under the house wrap. Just remember it’s all about layering.
Finally you can install the decking. The siding above should terminate slightly above the surface of the decking to allow air into the space. Just remember, if water gets into that intersection it’s now going to follow the plane of the drip cap and be pushed out away from the house. If you follow these steps the next time you install a deck you’ll be sure to eliminate a premature failure due to excess moisture and rotting.
Alternate Detail for Masonry Siding
If you have brick siding then you need to use a slightly different approach. Below is a sketch showing a section of the brick wall. The steps are as follows:
- Grind out the grout along a row of bricks.
- Fabricate copper flashing. The flashing has two details worth pointing out. On the end that will fit into the mortar joint bend a very small hem that will act as a wedge. On the lower exposed side bend a standard hem.
- Insert the flashing into the mortar joint so that it fits tightly with the wedge.
- Seal the joint with a high quality flexible caulking.
If you’re planning on building a new deck get yourself the Complete Guide To Decks
If you want to make your own flashing you can purchase a Tapco 10558 PRO 19 10-Foot-6-Inch Wide by 19-Inch Throat Portable Brake
Recent Posts
Framing Stick Nailer vs Coil Nailer
Which is Better a Stick Nailer or Coil Nailer? Framers have many choices in nailers…
How Many Roofing Nails Per Square of Shingles
Estimating How Many Nails for a New Roof When it comes to estimating materials for…
Composite / PVC Decking – Layout Tips & Advice
Composite / PVC Decking Layout Tips and Advice Composite and PVC decking have really changed…
Benefits of an ERV System (Energy Recovery Ventilator)
Benefits of ERV Systems (Energy Recovery Ventilator) If you're building a new home or doing…
Vermiculite Attic Insulation Abatement
Vermiculite Attic Insulation If your home was built before 1990 there is a chance it…
Nuisance Tripping of AFCI (Arc Fault) Circuit Breakers
Arc Fault (AFCI) Circuit Breakers Tripping Often An arc-fault circuit interrupter (AFCI) or arc-fault detection…


View Comments
I am planning on installing a potch roof over my concrete patio. The ledger board will be installed to the second floor joists. The second floor joints are fabricated wood I beams joists. The ledger will be perpediular to the wood I beam joists. The second floor joist wrapper is sheating not 2X. The house is located in PA. What is the recommended method to attach the ledger board to the ends of the I beam joist and joist wrapper(sheething)?
Regards,
Jeff
@ Jeff - Are you really serious that there's no structural rim joist attached the the I-Joists? Depending on the manufacturer of your joists that may be a rather significant structural issue. I'd look into that with your builder or local building code official or a local engineer. The rim joist provides structural stability for the I-joists and helps transfer vertical loads from the framing above.
As far as attaching a ledger it would depend on if you have access to the I-joists from below. Do you have access? Do you have any photos?
I'm planning a deck above a walkout basement, but I have the same problem. No rim joist on the house to attach to. The ledger will be running perpendicular to the fabricated I joists. I asked a local lumber supplier about it. He knew exactly what I was talking about but only had two options. One, fasten the ledger to the brick (which is against code), or two, put posts/beam near the house and don't connect to the house. The problem with putting them near the house is the post footings need to go 8ft deep. Any other possible solutions?
Curtis - Can you be more specific about the joist/wall detail? Do the joists just run out to the plywood sheathing? Do you have access to that area? If so you could install blocking/diaphragms between the joists prior to installing the deck ledger. To do that you would have to "pad" out the webs on the I joists and install the blocking/diaphragm with an approved connection that will transfer the load from the ledger into the blocking and into the floor system.
If you make a large enough footing for the locations, they only need to be below the frost line of your area. I am in Baltimore and footings must be 30" below grade. Typical footing at this depth for a 6X6 post should be 12" deep, 24X24 but once that is poured with steel reinforcement in it, you need to have rebar to attach to a pour that should go from the footing to 8" above grade with an anchor bolt embedded in top of pour, this should be twice the cross section of your post, so 12X12 pour. If your home is built with engineering I beams and is an older home, you are required by code to not use the connection to the house for load bearing, hence free standing design must be used. You can attach to the house for stability only and you cannot go over certain heights 9check local code) to an upper floor from any point at grade without angle cross bracing.
There are decent books on decks that cover most of this at Home Depot and Lowes.
Alston Davis
Alston - Thanks for sharing your thoughts. Just curious why you posted on an article about rim joists? Also, your advice only is applicable in your area. In many areas what you have proposed is not relative or true. In our area, we can attach a deck to a house with I-Joists, so long as there is a structural rim board (which we almost always use around here). Also, footing depths are MUCH deeper up here in the North.
If you have access to the joists from below or are willing to cut an access area into a drywall ceiling then the solution may be a DTT2 (Deck Tensioning Tie) from Simpson Strong Tie. As Todd stated, blocking within the web of the I-joist would be needed. This hardware is also helpful for attaching the 4x4 railing posts to rim/end joists. Visit this link for more info. (BTW, I'm not a Simpson salesman! Just a builder happy to share knowledge).
whoops, forgot to post the link...here it is:
http://www.strongtie.com/ftp/fliers/F-DECKCODE13.pdf
Another thing to point out (didn't see it in the article) is to make sure you don't nail the deck boards into the band and through the Z flashing, last summer I had to replace all the siding, most of the framing, and detach a second floor wrap around deck because the builder had done this and the flashing failed causing water damaged inside the walls and rotting the entire band as well.
We used a bitchathane membrane behind the rim when we replaced it, was my first time using it.
Also an alternative to the ledger board is using joist hangars instead, some people prefer hangars...
Nice description Todd.
@ Keith - Thanks for that tip. Decks really should have a ledger in addition to the hangers. The hangers shouldn't be attached directly to the house, mostly due to the fact that there's not good way to flash the connection. Structurally it's not a great detail either.
Thanks for all the great info on your site. I plan on adding a small deck this summer. Your technique sounds very good (I just wish I could enlarge the images). My question is how to handle flashing around existing vinyl siding. I will need to cut out the siding to add the ledger board, so what is the best way to extend the flashing up behind the siding without having to remove all the siding from the top down? Also, I have 3/4" of rigid foam behind my siding. Should I flash from the outer surface of the foam board, or go behind it to the sheathing?
@ Deejay - Thanks for the compliment. First off you'll want to get yourself a vinyl siding hook that allows you to "unbutton" the siding without taking everything down. This way you can remove the siding up above the ledger board by a couple of courses and install the flashing properly. I would install the flashing behind the foam board directly to the sheathing, then let the foam cover the top of the flashing. Good luck!
I am having a deck installed this summer. The contactor has asked me if I want him to bolt the ledger to the floor joist in the house or into the concrete foundation. He says he can do either one and prefers to go into the concrete foundation because of the stregnth. I have found little research comparing the two methods. Do you know of any studies comparing the two? Which method is stronger?
Julie - The devil is in the details. Either method will work fine when installed properly. The strength comes from the connections so both methods can achieve similar results if installed properly. I would suggest using whichever method leaves the finished deck at an elevation that best suites your needs. I prefer to have the finished deck surface about 6 inches lower than the floor you're walking out of. This helps with water problems and also eliminates the need for more than one step which could lead to unnecessary trips. Good luck.
Great details Todd, my problem is the deck i have was installed without a flashing, now how do i install one on an exiting deck?
Alex - Depends a bit on what type of siding your house has. Typically it will involve removing some of the siding and some of the decking in order to install the flashing. Then you'll need to re-install.
Thanks, i checked with a few of my neighbors and all the decks were installed the same way. All the houses have vinyl siding, already had one contractor out to look at the problem, didn't like the way he described how to repair. Will contact neighbor to see what hes' going to do. Thanks again
Alex - Best of luck, proper flashing is critical and removing siding is the only way that can properly achieve that.
We are currently building a low profile deck on what seems to be an old deck that was eventually closed in to be part of the house. The flashing on the old part tucks into the siding and lips over the existing floor boards about 1/4", showing on the outside of the house.
The problem is we don't know the best options for our new flashing. It can't tuck up into the siding, the best it can do is tuck into the 1/4" overhand of the older flashing. Do you have any suggestions.
Thanks in advance,
Jenny
Jennifer - Do you have any photos? If so email them to todd at frontstepsmedia dot com.
Ok, sent photos hope they get to you. Let me know if it doesn't come through. Thanks again for your help.
Two questions -
1. Any recommendations on flashing up to a log structure? I have a log home with an existing deck which has the deck ledger attached directly to the house rim joist with out flashing or washer spacers for a water gap. My first thought is to remove decking near structure and cut a notch to tuck flash into. Suggestions?
2. Suggestions on flashing for building a new deck to a log home?
Andy - Can't say as though I've flashed a deck on a log home. Couple of thoughts though:
1. Will either deck be on the eave side of the home?
2. My first reaction is to install the ledger with spacers, the hold back the decking. This allows water to get past and not get stuck against the building.
3. Cutting a notch, tucking flashing in, will most likely cause a worse problem as it will be a place for water to get trapped.
Those are just some thoughts that come to mind.
Thank you for the quick reply. Both decks are on eave sides of the home. The new deck is a replacement. When I tore the prior deck off the house I found the builder had put the deck ledger and rim joist together and then ran a bead of ?caulk? along the top of the union. This eventually allowed water to seep between the boards and caused rot, thus the replacement deck. I want to ensure I do not cause the same problem on the new deck. Is there a way to attach a pdf drawing of the way the logs, rim joist and deck ledger come together?
Andy - Any chance you can send me some photos of the existing? send to:
todd at frontstepsmedia dot com
Todd, thanks so much for this fantastic information and your willingness to answer our questions! We have two units in our condo that have suffered damage because of poor or non-existant flashing. We have received a proposal from a contractor to fix these two situations (minus the actual damage caused by the lack of pan). None of us on the condo board know anything about construction so I was wondering if you could take a look and let us know if this quote makes any sense. It seems overly simplistic, but we're not experts. thanks in advance
Description of Work to be performed:
Install proper flashing to Units 31, 35 and 36 sliding glass door and deck
• Remove the existing interior and exterior sliding door trim
• Remove the existing sliding glass door
• Remove any deck boards restricting the installation of proper deck flashing
• Install a copper door pan and copper deck flashing, copper seams will be soldiered
• Re-install the existing sliding glass door
• Insulate the door surround with low-expanding polyurethane spray foam
• Install new interior and exterior sliding door trim
• Caulk as necessary
Estimated Cost: $1,940 Each Unit
Total Estimated Cost for all three units: $5,820
The estimated cost includes the necessary materials, labor and removal of debris to complete the project listed above.
Excluded from the estimated cost is the necessary painting of the affected areas.
• If an original sliding glass door exists it is recommended that the existing sliding glass door be replaced at the time of this work
Michelle - Seems very reasonable especially considering they are proposing copper flashing.
I have taken bids to replace brick moulding on my back door which has rotted. Also, the band board is rotted under the door. In addition I have been told by at least 2 contractors that the ledger board was not properly flashed on the deck. In order to flash the deck properly, I was told probably at least 2 boards will have to be removed. The deck is Trex (a composite) with 3 3/4" screws. Today a carpenter in the neighborhood came by and told me it is not necessary to re-flash the deck as the ledger board is treated. I would like to believe that but if it is necessary it seems it would be easier to do it now while the door will be removed.
The owner of the company that built the deck was called back once to flash the deck. At that time he somehow got under the deck and attached some aluminum looking material under the deck. Next another carpenter attached what looks like j channeling along the top of the deck. Help! what do I do now?
If flashed properly does the flashing than cover the bolts or whatever you use to attach the deck to the house?
Donna
Donna - First let me say that the local carpenter is off base and missing the point. Ledger cap flashing ensures that water doesn't get behind the ledger and rot the band board (rim joist) and then get into the structural framing.
Ultimately the flashing only has to get up behind the siding for several inches and over the top of the ledger and partially down the front edge. Again, this is just to keep water away from the house. The flashing isn't there to protect the fasteners or ledger.
Good luck.
Todd,
Thanks for your response. I am concerned that the Trex deck is going to be mutilated if the boards are to be taken up to allow the flashing to be done properly. I still have some of the screws that were used to build the deck and they are 3 3/4 in.
On the other hand if not done properly now then what?
So far the band board appears to be rotted just 16 in. between the floor joists.
Donna - It's likely that the cause of the rot now is the missing flashing. Was the decking top screwed or attached with hidden fasteners? If it was top screwed the damage should be minimal. If not I would still remove it and the worst case is putting some new decking on. This is much better than having your walls/framing continue to rot over time. Wish I had better news.