How To Install EcoSmart LED Downlight Fixture
EcoSmart LED Downlights for Recessed Light Fixtures
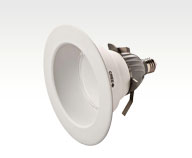 In a recent article we talked about our trip to The Home Depot learning about LED Lighting Options. One of the most impressive options available for recessed lighting was the EcoSmart LED Downlight. The EcoSmart Downlight is a 65 watt equivalent LED bulb with integrated trim which fits most standard and shallow 6″ diameter recessed “cans”.
This “unit” really impressed me because of the uniform light that it produces. The key to that comes from the integrated trim and lens. What’s also impressive is the ease in which one of these can be installed. This is certainly a project that most DIY’ers can handle with limited tools.
Below are some easy instructions along with a short video showing you how to replace your incandescent or cfl recessed light bulbs with the new EcoSmart LED Downlight.
How To Install EcoSmart LED Downlights
Warning: Working with electrical circuits can be very dangerous resulting in serious personal injury of even death. Before working on an electrical circuit be sure to consult a licensed electrician and follow all local and state regulations. I am NOT a licensed electrician and therefore the content on this site is only for information purposes.
- Shut Off Electricity – Before beginning any electrical project it’s important to turn off the breaker or remove the fuse for the circuit that you’re working on.
- Remove Old Light Bulb – Remove your old incandescent light bulb or compact fluorescent bulb (if you’re removing a CFL bulb be sure to dispose of it properly).
- Remove The Trim Ring – Most modern recessed light fixtures have two basic parts; the can which houses the electrical components and a trim ring or finish ring which creates a decorative transition between the ceiling and can. Most trim rings are secured to the can in one of two ways. In either case the steps are similar. First pull down on the trim ring and look up inside the can. You should see either a pair of springs or a pair of spring clips. Reach up and unhook the springs or squeeze the spring clips to release the trim ring.
- Remove Socket Mounting Plate – Some recessed light fixtures (like the one in our video below) contain a socket mounting plate. You’ll need to remove the socket mounting plate by removing a wing-nut or screws. You’ll also need to disconnect the light socket from the socket mounting plate by simply depress a spring clamp or removing some small screws.
- Install EcoSmart Downlight – Next all you need to do is simply screw in the EcoSmart Downlight into the light socket like a traditional light bulb.
- Rotate Flip Clips – Rotate the flip clips located on the housing of the EcoSmart Downlight.
- Slide EcoSmart Downlight Into Light Fixture – Finally slowly slide (push) the EcoSmart Downlight up into the recessed light fixture. The flip clips act as retainer springs and will firmly hold the light in place.
- Turn Power On and Test – Finally turn the circuit breaker back on and test the new EcoSmart LED Downlight.
Final Thoughts
Installing the new EcoSmart LED Downlights is really easy and only takes about 5 minutes. You can learn more about EcoSmart LED Lights including installation videos at this link.








Leave a comment