How To Build Custom Wood Plantation Shutters / Blinds
Building Moveable Wood Shutters Using Rockler’s Shutter Building System
Wooden shutters can add a serious touch of class to any room and they are a great option for rooms that require privacy like bathrooms. While wooden shutters look amazing they are often extremely expensive and most often need to be custom built to fit into the unlimited number of window sizes available today. So last year when Rockler announced they were going to be offering a shutter building system I was very excited.
I’m currently in the process of building a great new woodshop where I’ll be building lots of projects and testing lots of tools for www.ToolBoxBuzz.com. The shop has one large window that lets tons of great light into the shop. However, when I’m filming and photographing projects and products for the websites I need to control that light source. So I wanted a great set of blinds or shutters to accomplish that task. Bonus points if I could get natural wood shutters to match the rest of the wood shop.
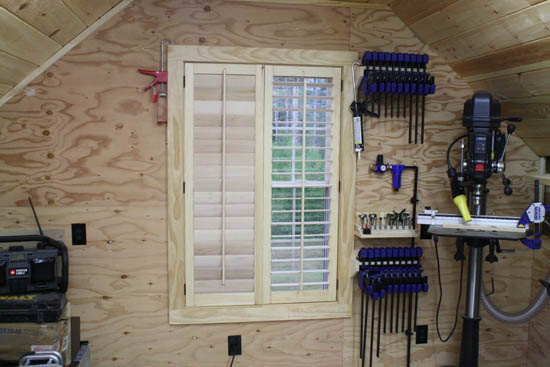
Rockler agreed to send me a kit along with the louver materials to build two wood shutters for the shop. As with any customer, I had to source the other misc. materials including the wood for the frames. If you like the look of the shutters above then you should keep reading to see how easy it is.
Rockler Shutter Building Kits
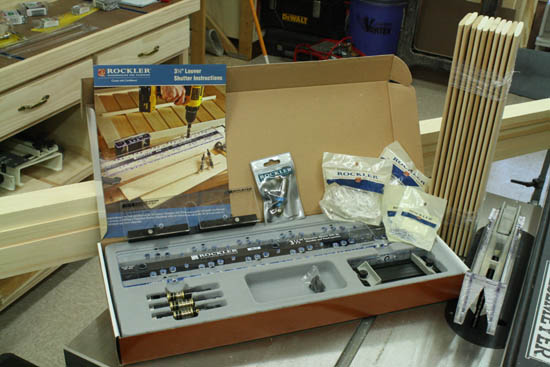
The key to this project is buying a kit from Rockler for building wood shutters. They offer three different size louver kits (1-1/4″, 2-1/2″ and 3-1/2″ louvers) in both fixed and moveable. So it’s possible to make 6 different types of shutters in most any size you can dream up.
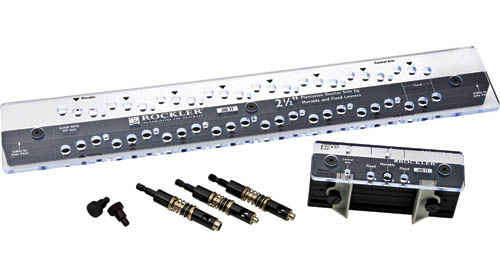
The kits include everything you’ll need to build the shutters including drilling jigs and specialty drill bits. Everything you need to build the shutters can be found on the Rockler Site HERE.
Design Measurements
Once you decide what type of shutter you want, the next step is measuring the window opening and entering that information into Rockler’s Shutter Design Wizard. The wizard takes you step by step and asks you for all the necessary measurements, type of shutter, size or louvers, etc. After entering all that information Rockler emails you a set of blue prints with all the necessary information including the dimensions of all the wood frame pieces you’ll need to buy and create.
Once you get the blue prints from Rockler it will include a complete list of materials. The list of materials will include products you can buy directly from Rockler like the louvers, louver pins, control arm pins, and router bits that are needed. You’ll also need to go to your local lumber yard and buy material for the shutter frames and control arms. You’ll also need some glue and hinges which you can buy either at Rockler or your local lumber yard.
Building Shutter Rails and Stiles
The first step in building your custom wood shutters is building the rails and stiles for the shutter frames. The blue prints that Rockler provides give exact dimensions for the shutter frames. You’ll need at a minimum 5/4 material (1″ thick) so be sure you don’t be 1x (3/4″) material when you go to the lumber yard. To build the rails and stiles you’ll need to rip the material down to the correct width using a table saw. Then you’ll need to cut the pieces down to length with a miter saw or the table saw.
The shutters also have some nice edge details that give a really nice look. If you look at the adjacent photo you’ll notice two edge details that come together to make the look. The left piece is the shutter stile which has a simple round over edge detail. The detail is made using a router bit which you can get from Rockler (it will be listed in the material list). The piece on the right is the shutter rail. The shutter rails have a small 1/8″ chamfer on each end. When the two pieces of joined together it makes a really nice detail.
The next step is drilling holes in the shutter stiles. The holes will hold the louver pins. Drilling the holes is very easy when you use the jig that is supplied with the shutter kit. As you can see above the jig is set up to use on both the left and right stile at the same time. The blue print shows where to start the first hole adjacent to the shutter rail, after that it’s a matter of drilling the indicated holes and moving the jig down the stiles until you reach the last hole.
Cutting and Prepping Louvers
Once you’ve built the frames (do not assemble them yet) it’s time to cut all the louvers to length, drill them for the end pins and control arm. The prints tell you exactly how long each louver should be. If you buy them from Rockler they will come slightly longer than you need. This will let you cut them to length and be sure you have a nice smooth cut. I recommend setting up a stop at the miter saw so you can be sure each louver is cut to the same exact length. Once you cut them I recommend lightly hand sanding the edges for a nice clean professional look.
Once you’ve cut all the louvers to length you’ll need to drill holes in both ends (at the center point) and also a single hole in the middle of each louver edge for the control arm. The holes are drilled using special bushing bits that come with the kit and a jig. The process is easy and quick to use. After drilling the holes you’ll need to install the plastic shutter pins in the ends of the louvers. The pins can be purchased from Rockler.
Assemble The Frames
Once all the louvers, rails and stiles are prepared you’ll need to assemble the frames. Before assembling the frames you’ll need to decide how you want to make the frame connections. For my frames I used pocket screw joints. However, you could use biscuits, dominoes, or dowels to make the joint. I used pocket screws because they are really strong, easy to use, quick, and my shutters are in a shop where I’m not as worried about seeing the joint preparation.
I also glued each of the joints to ensure a long lasting tight fit. I recommend using a good quality wood glue that can easily be cleaned off the wood (if you’re doing to stain or urethane) or a urethane glue if you’re going to paint the shutters.
I found it very useful to assemble the top and bottom rails to one of the stiles before installing the louvers. Next I installed each of the louvers into the stile that I already connected to the rails. As you can see above I laid out each of the louvers one by one until the entire frame was filled. It’s also important that the louvers all lay in one direction with the control arm hole always facing the same direction.
Shutter Control Arms
Once the shutter frames are assembled you’ll need to attach the louver control arms. The control arms are built out of a small rectangular piece of wood. The top rail also needs a slot routed in it so the control arm can tuck out of the way when the louvers care closed. Rockler also sells a template jig for that as well as shown below.
The shutter control arms are connected to the louvers with a small wire hook. One hook is installed in the control arm and one hook is installed in the louver. The two hooks are looped together.
As you can see above the two hooks are “looped” together so that as you move the arm the hook on the arm pulls at the hook on the louver thus moving the louvers with the control arm.
To install the hooks the directions recommend using a pair of pliers as shown above. The hook is pushed into the hole and stays in place with a friction fit on the hook barbs. I’ll be honest, this was my least favorite detail for the shutters. I found it difficult to do and ultimately the shutters are a bit difficult to operate with this design. Don’t get me wrong, I’m very happy with them but I’d like to see Rockler come up with a different detail/approach for this.
Hanging The Shutters
There are several different ways the shutters can be hung from the window jambs/casing. For my shutters I chose to hang them from the window jamb using 3 simple hinges per shutter.
Final Results and Thoughts About Rockler Shutter System
I’m very happy with my new wood shutters that I built using the Rockler Shutter Building System. The shutters look amazing and they work just like I had hoped.
As you can see the shutters look amazing and they match my shop really well. The shutters are great for blocking the sun light when I’m filming. When I want some light I can easily open the louvers to let it in.
Overall I’m very happy and pleased with the shutters that I built using the Rockler Shutter Building System. They look great, the blue prints were spot on and the entire process of ordering the materials was very easy. It took about 6 hours to build the pair and the costs were substantially less than buying custom wood shutters.
- Wood materials cost: $68 for all the rail, stile and control arm material.
- Hardware cost: $70 for the louvers, pins, hooks and hinges.
- Jigs and Misc: $165 for the jigs, and one router bit.
- Total Cost: $303 to build two shutters.
This cost includes the investment of the jigs and bits. So the cost for a pair of shutters without the jigs is roughly $140. Custom wood shutters average about $30/sf. My shutters cover 15 sf which would have been $450. So clearly the cost savings is huge and it’s a fun project. If you’re interested in having custom wood shutters for your home I highly recommend the Rockler Shutter Building System.
If you’d like to see a video of this process check out the following video. It’s about 15 minutes long but it takes you through the entire process so you can see how easy it really is.
Recent Posts
Framing Stick Nailer vs Coil Nailer
Which is Better a Stick Nailer or Coil Nailer? Framers have many choices in nailers…
How Many Roofing Nails Per Square of Shingles
Estimating How Many Nails for a New Roof When it comes to estimating materials for…
Composite / PVC Decking – Layout Tips & Advice
Composite / PVC Decking Layout Tips and Advice Composite and PVC decking have really changed…
Benefits of an ERV System (Energy Recovery Ventilator)
Benefits of ERV Systems (Energy Recovery Ventilator) If you're building a new home or doing…
Vermiculite Attic Insulation Abatement
Vermiculite Attic Insulation If your home was built before 1990 there is a chance it…
Nuisance Tripping of AFCI (Arc Fault) Circuit Breakers
Arc Fault (AFCI) Circuit Breakers Tripping Often An arc-fault circuit interrupter (AFCI) or arc-fault detection…


View Comments
I like this article, but I have 29 windows that I want to build plantation blinds for instead of buying them.I know my way around the house and tools (diy). Iam needing to know what are the proper tools that I need to build some nice shutters. I have time on my hands. Thanks
Ronnie - To build a set of shutters you'll need several power tools. At a minimum you'll need a drill, table saw, miter saw, some clamps, and the shutter jigs. Good luck.
Todd thanks for your input.Can you recommend any brands of tools,table saw,router and router bits.I know that there is a wide range of prices and brands.I am more than willing to spend the money for proper tools,I rather spend more for a better tool that will last through 29 sets of shutters and some other projects than trying to save a couple of $s and get a inferior tool. I already have drills and miter saw,drill press and band saw.Thanks for your time.
Ronnie - Here are some to consider.
- I really like Porter-Cable routers. This is the main one I use in my shop. http://www.toolboxbuzz.com/power-tools/routers/porter-cable-multi-base-router-kit-895pk-review/
- Tablesaws can run the full range from jobsite saw to a cabinet saw like the Delta Unisaw that I use. What size / price point are you considering? With that info I can make a few recommendations.
- Typically I buy my router bits from Rockler and/or Amazon. Most often I'll buy Freud or Rockler brand.
Thanks Todd,looking between $1000-$2000 for all tools and templates.
Ronnie - Here are a few suggestions. Are there other tools you need suggestions on?
http://www.amazon.com/exec/obidos/ASIN/B000S5S5CW/toolboxbuzz-20 Bosch Tablesaw - Portable
http://www.amazon.com/exec/obidos/ASIN/B007HC6ZUI/toolboxbuzz-20 JET Tablesaw - Larger Contractor Style
http://www.amazon.com/exec/obidos/ASIN/B0000DCBKN/toolboxbuzz-20 Porter-Cable Router
http://www.amazon.com/exec/obidos/ASIN/B0044BBOQK/toolboxbuzz-20 Kreg Jig System
Nice job but I have some questions regarding Rockler's solution. What material did you use for the control arm? Rockler sells a control arm but its only 36" long. Rockler recommends adding a middle rail for shutters over 48" in height. Big flaw in the software, if you configure a window with a front control arm and a height longer than 48" lets say 60" the diagram the software provides does not show you that there should be a middle rail or eliminate the shutter that is to be replaced by the middle rail nor does it provide you any information on how to deal with the control arm. My preference would not be to install a middle rail and have one long control arm. The software specs out all the pieces for fitting the control arm but nothing on the arm itself. I'm about to pull the trigger on the Rockler solution for about 30 shutters but hesitant because of these issues. Curious on how you approached it.
Frank - Well as you can see from my article my shutters were considerably longer than 48". Mine were just shy of 60" and I haven't had any issues with the frames. I built my frames from pine including the control arm. If I were going to install a middle rail I'd likely use the software for each panel independently so the spacing works out, then use two smaller control arms. Haven't really given it much thought though but that seems like a reasonable approach. Rockler has always been very helpful when I have questions, I'd recommend reaching out to them and asking how they treat that situation. Good luck.
Mr. Frank,
I was just wondering if you could tell me the exact width of your stiles and rails. Lowes and other hardware stores only sell .75 inch thickness pine boards, not 1 inch. Just wanted to know if this was what you used? Thank you!
Mariano - You really need at least 1" thick material, 5/4 boards, you can get them at a local lumber yard typically. I wouldn't make these shutters with 3/4" material.
Todd, thanks for the article and video. I am curious about how much time in hours it took to build the shutters?
John - It took me about 4 hours to build a pair. After doing it once, I could probably reduce that in half or more, especially if I had things set up to mass cut all the materials. Like anything, the original setup and figuring out all the details takes some time.
Nice ! I think the hooks could be replaced w/ little eye pins used in crafts/jewelry making. They're cheap & should be easier to just screw in than the wire hoops.
Great how to article. I am tempted to buy the jig set but, I am hesitant because I wNt to know if the jigs are built to last or for a single use.
Definitely quality stuff that will last. I've had great luck with Rockler jigs of all types.
Todd, I just built my 1st pair of shutters. They fit into the window opening, when dry fit. However, when glued they are too wide in the middle. My stiles are 52 inches. Gluing the rails to the stiles seems to have made the stiles bow in the middle. Maybe this is why a middle rail is recommended beyond 48 inches.
Todd, have attempted plantation shutters on 4 of my windows using damaged shutters that were being replaced. All had to be resized and reframed. Came out better than I anticipated. I have 8 additional windows that I would like to take a crack at. Learned a few tricks about measuring building and installing the shutters during this first phase of my project. Now to my question: is there somewhere I can purchase just a fixed number of 4.5” wide louvers.
I really don't know, Rockler has a lot of stuff, but maybe not the size you need.