Closed Cell Spray Foam
Using Spray Foam To Insulate Homes
Very few materials have dropped in price with regard to new home construction over the last few years. One huge exception to that rule though (at least here regionally) is the price for Spray Foam Insulation. Once considered the “Cadillac” of insulation only used on the most expensive projects it’s now within reach for lots of new homes.
Spray foam offers some advantages over other traditional insulation projects like fiberglass and even dense packed cellulose or fiberglass. The real advantage is the ability to completely seal out air penetration and vapor movement (at least with closed cell products). Since air infiltration can account for upwards of 40% of heat loss it’s imperative that we stop as much of it as possible. By using spray foam we are able to significantly cut down on the amount of air infiltration and make a drastic difference in the homes performance.
Pay Attention To Specifications and Details
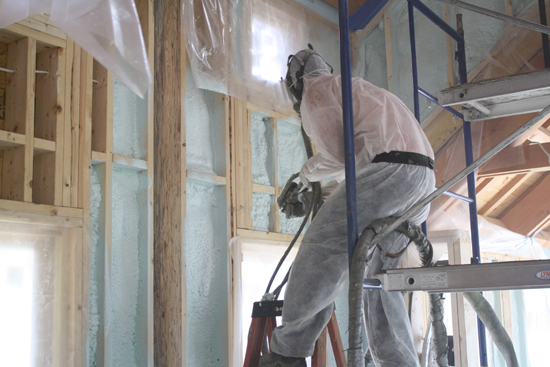
On a current project at work we’re using closed cell spray foam for all the exterior walls and several low slope “shed” roofs where ventilation would be very difficult. When the project was first started the idea was to use either dense pack cellulose (wet sprayed) or dense pack fiberglass insulation for the walls. Once estimates came in we quickly realized that spray foam would be the obvious choice on this project. The house is around 3,000 SF and the total cost to upgrade from dense cellulose to closed cell foam was only $386.
Ok so here’s where you really need to pay attention. As always the devil’s in the details and you can easily be fooled if you’re not careful. First of all I’m a HUGE advocate that ALL spray foam in residential construction be closed-cell foam. The bottom line is closed-cell foam is the only way to guarantee the foam doesn’t absorb water and it also ensures that air cannot pass through it. Sometimes less than honest contractors will try to sell you open-cell foam as it’s quite a bit cheaper but please don’t fall for that game.
Secondly the next issue is R value, depth of foam. All foams are different and all foams have different R values per inch of depth. You need to specify the minimum R value and not the depth. Let the contractor figure out how much foam to use.
Lastly the density of the foam can make a huge difference on how well it stops air. For this project we used Demilec HeatLok Soy 200 which is 2.1-2.2 pound density and an R7.4 per inch of thickness. You can find contractors that will try and sell you a 1.4 to 1.8 pound density foam for the same price as a high density. What does that mean? It means you’re getting less foam and more air….which means you’re likely not stopping as much air and you’re not providing as much insulation value.
Unvented Roofs
Another great advantage with using spray foam is the ability to insulate the underside of a roof. On this project we insulated the bottom of a couple low slope roofs that were nearly impossible to vent properly. Using the foam allowed us to eliminate the venting for a roof that will perform much better and be far less likely to have ice dams.
If you look closely in the photo above you’ll see the upper roof area above the ceiling has been insulated with spray foam. This particular roof is only a 3.5 pitch which would be highly prone to ice dams. With the spray foam there will be nearly no chance for escaping hot air to cause ice dams.
Cost of Spray Foam
For this particular project we were using 3 inches of closed cell foam for an R value of 22.2. In some areas we used as much as 6 inches of foam or roofs. To spray 3″ or R22 on this project cost about $3 per sq. ft. Conventional fiberglass with vapor barrier would likely cost about $1.75 per sq. ft installed. On the other hand, the dense packed fiberglass option was only $386 cheaper than the foam.
The key here is to pay attention to the specifications and be certain you’ve got the right products. I’d Highly recommend that home owners get at least two estimates and be sure the contractor shows up on time, completes work on time and cleans up. Be sure the estimates are apple to apple comparisons as well.


Your comments about use in low slope shed roofs caught my attention. Could this be an option for re-insulating existing homes? I have a very low slope shed dormer and have struggled mightily with ice damming. I can’t get anywhere near the soffits from inside, since the space gets way too narrow. While I could probably pull out the existing fiberglass (which I can see blocks any venting in most places) with some tools on an extention pole, I would never be able to re-insulate properly and keep vents open. The idea of spraying foam to insulate the underside of the roof near the wall sounds like a good option, but only if there is a way to extend the spray nozzle into that tight space. For now, I count on my electric heat cables to keep the ice dams at bay.
Max – Spray foam is certainly an option that can help pesky locations like your dormer. The best way to approach this is by having 2 or 3 reputable foam insulators give you estimates and “proposed” methods they think will fix the problem. I’d ask if any have experience with a similar home as a reference.
If I’m having water infiltration problems in my basement, I’m told by my insulation contractor that the spray foam will seal that out. But aren’t I trapping the water into the cinder block and won’t that create damage over time to the block foundation?
Water won’t hurt concrete block. The real question is will it seal it completely
I want to insulate a 8×10 shed, with a type that will keep it warm enough for stray cats in the winter (lows in 10-20 degrees). I’m working with a tight budget. There is no ceiling, just a pitched roof.