Ice Dam Problems
Last year we saw some incredible ice dam damage in this part of the Country. With winter bearing down on us now is the time to take corrective action. This article should help you understand the issues of ice dams and how they are formed. Last year we ended up doing hugely expensive repairs for a commercial building that had horrible ice dams.
Signs of Ice Dams
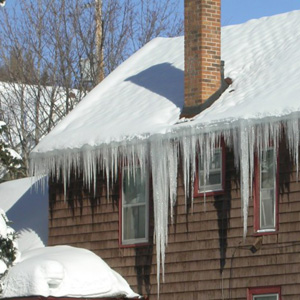
Does your house look like this one in the winter? I drive down the road all winter long and see house after house with the tell tale signs of ice dams. Those massive icicles hanging down from the roof eaves are a sure sign of a potential ice dam problem in the near future.
Ice dams are the result of several factors all working at the same time. They include:
- Inadequate ceiling insulation
- Poor soffit and ridge vent ventilation
- Cold temperatures
- Sunny days
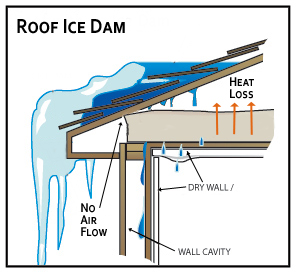 Ice dams are formed when warm air leaks into the attic space and warms the roof enough to start melting snow. This combined with snow melting from the sun causes the melting water to start running down the roof towards the eave. As the melting water reaches the edge of the roof it ends up over the part of the roof that’s cold and it freezes.
As the cycle continues the ice builds up a dam near the eave. This causes the continuing melting water to back up behind the “ice dam”. When the water get’s deep enough it begins to back into the shingles and leak into your home.
How To Prevent Ice Dams
Preventing ice dams is a fairly easy process. Obviously it will cost some money but the cost of it should pay back in better energy efficiency within your home. The steps necessary to prevent ices dams are:
- Improve the insulation in your attic. This might be achieved by installing another layout of fiberglass batt insulation. Another option which I prefer is to install a layer of blown-in cellulose attic insulation. This will help eliminate heat loss from your home that causes roof snow to melt. Obviously this should help reduce your heating and cooling bills.
- Install sufficient soffit vents and an adequate ridge vent. This can be quite a job and one that might be better tackled by a professional. It’s really important to clock off air flow to gable end vents if they are present as they “short circuit” the soffit / ridge vent system. The soffit and ridge vent allow cool/cold air to travel up along the underside of the roof to help prevent snow melt.
- The next time you have new roofing installed be sure your roofer installs several feet of an Ice and Water shield product to help guard against water damage due to ice dams.
- I also recommend that you use a roof snow rake to remove snow from the roof eaves after snow storms. This allows the sun to continue melting snow along the edge to prevent the ice dam from forming.
Adding More Insulation May Cause More Damage
So at the beginning of the article I mentioned some ice and water damage at an elderly housing facility. The explanation is rather complicated but worth pointing out.
About a year ago the facility decided to add some additional blown in cellulose in the attic space above a dining room. The dining room is on the first floor with attic space above it. The attic/roof over the dining area runs up the building and meets the 2nd story attic above the main living portion of the building. In essence the dining room looks like a shed roof formed off the main roof.
So after insulation the attic above the dining area only that space had sufficient insulation in place to keep the air and roof very cold (just what is wanted on a roof in this part of the country). The problem is that the upper portion of the attic did not receive the additional insulation and it was a much warmer space. Remember the two spaces are adjacent to each other and share a common roof plane.
So as snow melted on the upper roof from the warm attic air the water ran down the roof until it hit the lower roof with the colder attic. That lower roof was cold enough that the water froze. Essentially the entire lower roof became a skating rink with catastrophic results. Water was pouring into the space ruining the ceiling, insulation, flooring and wall finishes.
I bring this up so that people realize that careful analysis and consideration must be used when adding additional insulation to your home. Be sure you understand the entire roof mechanism and what causes ice dams.








Hey Todd,
Timly and Excellent article with great tips!
In my experience, ice dams usually occur after a heavy snowfall and several days of freezing temperatures. Warm air inside your home leaks into the attic and will warm the underside of the roof causing snow and ice on the roof to melt.
The most likely causes of ice dams are due to heat loss, air leakage and the general warming of the house structure due to conduction from the heated building.
The heat loss remedy is an easy one – add insulation like you suggested. It’s stopping the air leakage that can give your readers the best bang for their buck!
Sealing air leaks into the attic allows the insulation to do it’s job. Warm air can flow from the house into the attic space – insulation alone will not stop air leaks.
~ concord carpenter
Another timely bit of info from you! This is just one of the myriad reasons why I so appreciate your newsletter! Thanks again.
Good information for homes where attic space is not used as livable space. Looking for answers for those of us with attics that are used as livable space (1952 1-1/2 story cape cod). Where can one find more technical information on the dynamics behind the ice formation? And where can one find more information about companys that can do spray foam insulations? What companies are the major suppliers of spray foam insulation?
@ Liz – Can you describe your space for us? If so we may be able to explain the situation.
Freezeblock prevents water damage to homes from ice dams.
Todd,
I like that you mentioned other factors (Sun and cold) that can contribute to ice dams besides just air leaks and/or insulation reasons. For many in my neighborhood when the snow fell the wind was also blowing so the ridges of the roofing is exposed but the snow is thicker in other places. When the sun hits the dark material it will start to melt the adjacent snow despite being cold. The water runs down the roof under the snow and re-freezes when it is far enough away from the heated portion. Granted it isn’t as bad or pronounced as someone with air leaks and poor insulation though. Your point still stands though that a person needs to understand the whole roof mechanism.
Jeff – Thanks for sharing. The whole process can be quite complicated. The best defense is cleaning the roof! But for many people that’s not a great option.
Very glad we don’t have to deal with these issues in (my part of) Texas. Was interesting though. (Randomly came to this article from another Carpentry blog.) Thanks.
Hi Todd
I have an issue with frost forming on the interior of the drywall, in very cold weather. The frost forms where the wall and ceiling meet on the second floor on the backside (north side) of the house. I recently had a home energy audit and discussed this issue with the inspector. The roof is a 7/12 pitch and has no ice dam or snow accumulation problems, not because of heat loss, the snow just does not stay on the roof due to the prevailing winds. The attic has two layers of 12 inch fiberglass that extends all the way to the soffits. There are also rafter vents (channels of foam) from the soffits about 2 feet up the rafter toward the roof vent. The rafter vents are not attached to the underside of the roof decking, they are stapled to a cross member about a foot in from the soffit. The energy auditor suggested adding a piece of 1 inch blue board between the rafters at the soffit extending vertically up to the underside of the roof decking leaving enough space to reinstall the rafter vent and attaching the rafter vent to the underside of the decking. This should direct the air venting the attic coming in the soffits up to the rafter vent and up the underside of the decking so that the flow of cold air away from the wall/ceiling joint wont cool that joint enough for frost to form. Any help with those ideas?
Thanks
Dave
Hi Todd
I poked around on your site a bit more, excellent by the way. It sounds like my “proper” or rafter vents are not installed correctly. They are not attached to the underside of the roof decking, but stapled to a cross member about a foot up from the soffit so that they are off the underside of the roof decking by a few inches. They are not providing a very good channel for the air coming in the soffit up the rafter toward the ridge vent. I think for now I will skip the 1 inch piece of cut to fit foam board that the auditor recommended, thats a lot of work in a tight space, and just remove the improperly installed proper vents and replace with new ones stapled to the bottom of the roof decking as they should be. How concerned should I be with the sizing the proper vents? Do they need to span the whole rafter, or is the idea just to get a good channel for each rafter even if it is not the whole width of the rafter?
Thanks
Dave
There are calculations you can do for air flow. However, you’ll be fine if you choose a proper vent that fills up as much of your rafter space as possible. It doesn’t have to fit perfectly, but I would get all the air you can.
I agree with their assessment.