Radiant Tubing Into Concrete Slab Detail
Radiant Slab Heat
This post is an answer to a question a reader asked the other day. “How should I treat the radiant tubing into concrete slab detail?”
It just so happens that I installed the radiant tubing in our new home so I’ve got a bit of experience with this detail. Installing radiant tubing in a concrete slab is fairly straight forward. The key is to lay out the loops so that each loop is approximately the same length. Each loops starts and ends at the same point (location of the header manifold).
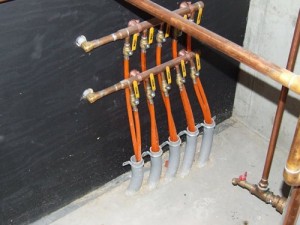
The easiest way I know how to deal with the location where the radiant tubing exits the concrete slab is shown in this photo. I used a 1 1/2″ electrical conduit 90 degree sweeps for each pair of radiant tubing. The conduit sweeps help make sure you don’t have a kind in the radiant tubing where it exits the concrete.
To support the conduit sweeps and radiant tubing during the concrete pour I pounded two wood stakes into the sub-grade on either end of the sweeps. Then I screwed a scrap piece of wood between the stakes centered at the top of the sweeps. I used metal conduit supports to hold the conduit sweeps securely against the scrap wood (if you look closely at the photo you can see the clamps still in place around the top of each sweep).
I rolled out all of the radiant tubing first. Then I installed the stakes and the scrap wood. Then I just slid the conduit sweeps down over each pair of radiant tubes and secured them in place with the clamps. Once the concrete slab is finished and set up you can just cut off the stakes flush with the slab. As you can see this leaves you with a very neat and organized layout for your radiant tubing manifold.


Leave a comment