Replacing Mulching Blades On John Deere X300
Replacing Dull Mowing Blades
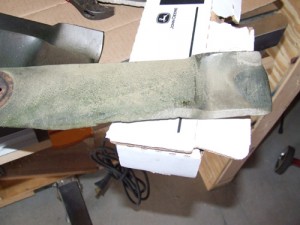
 Replacing dull, dented mowing blades is an easy DIY project and it will help keep your lawn looking great and your mower running at it’s best. As you can see in the photo my 2 year old blades were in pretty rough shape. Part of this is due to our new lawn and all the rocks and debris I’ve hit . I could have sharpened these most likely and used them more but I wanted to have a spare set so I ordered a new pair. (Be sure to read my post about buying mulching blades for John Deere X300). Replacing the blades on John Deere Mowers is pretty easy.
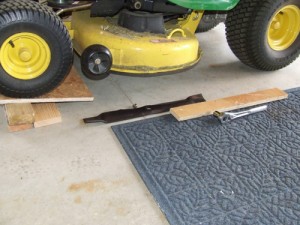
Replacing mower blades is really quite simple. There are two methods of doing it. You can either completely take the mowing deck off the tractor or you can use a ramp to get enough clearance under the deck to work. I chose to use a ramp because I really didn’t want to take the time to completely remove the mowing deck.
 If you decide to use a ramp be sure it’s sturdy and you lock the parking brake on the tractor. Drive the tractor up onto the ramp so you have at least 6 to 8 inches of clearance under the mower deck. Now you’re ready to lay down on the ground and replace the mower blades.
In order to remove the old blades and install the new blades you’ll need a wood block and a socket wrench. Install the wood block on an angle between the old mower blade and the mower deck to keep the blade from turning when you remove the nut. Use the socket to remove the old nut and plate washer. Notice how the old blade is oriented so you can put the new ones back in the same orientation.
Before you install the new blades its a really good time to remove old grass build-up from the bottom of the mower deck. A small flat putty knife works great for scraping off all the old build-up. You don’t have to get every last piece of grass out, just focus on all the large clumps of grass.
Now just reverse the order and install the new blades. Each blade kit comes with new washers that you should use. Be sure to torque the nuts according to the manufacturers recommendations. Now you’re ready to get back to mowing. The new sharp blades will cut the grass clean without ripping and damaging the grass blades. This promotes healthy grass growth and helps prevent disease.


Todd, I have a 2008 x300 mulching mower (it has a decal on the top left side of the deck that says: “the Edge mulch cutting system 42″”). I chose to remove the deck instead of trying to jack up the tractor. I followed the steps in the owners manual and I’d say it only took me about 10 minutes to remove the deck and slide it out from under the tractor. I must admit I was a little intimidated by this job when I first read the manual last year, but it really was a whole lot easier than I thought it was going to be.
The first thing I noticed when I took the deck off was that I had not been doing a good job of spraying off the grass from the top side of the deck. There was a lot of grass build-up under the belt pulleys–it actually was starting to get smelly and moldy…nice. From now-on I’m going to make sure to lower the deck all the way down so I can get the hose sprayer under those pulleys better.
I then flipped the deck over to get to the blades, being careful not to let the belt slip off of any pulleys and not to damage the pulleys, I rested the deck on a couple bags of top soil I had laying there in my garage…this worked well. I used one of those 4-way tire iron/lug wrench tools and a 2 X 4 piece of wood as a wedge to remove the blade nuts. I removed the left blade first, sharpened it by hand (per manual instructions for sharpening/balancing) and then reinstalled the blade before doing the right blade. I think the manual says to torque the blades to 50 ft lbs, but I just used the lug wrench and tightened by hand using the same amount of force it took to remove the nuts.
The underside of my deck was in really good shape. After every mowing, I raise the deck all the way up, lay on a creeper and spray the hose underneath the deck to get all of the grass clippings out of there (I just need to do better on the top side of the deck).
I wasn’t timing myself, but I’d say it only took me a couple hours from start to finish. The only part of the whole job that was a little bit frustrating was “leveling the deck.” Per the manual, whenever you take the deck off, you need to make sure it is level once you reinstall it. As it turned out, I had to raise the deck about 3/8th of an inch on each side. I was able to reach under the left side with a ratchet/socket and get to the nut I needed to tighten to raise the left side, but raising the right side was a bit more challenging as the ratchet/socket would not fit. I ended up using a crescent wrench to get the right side raised, but this was after some busted knuckles and a couple scrapes to the back of my hand. Also, when you raise one side, it affects the other side. So you are supposed to go back and forth from left to right and rasie each side a little bit at a time until you can fit the measuring tool under each side accordingly. This probably took me about 30 minutes of back and forth to get the deck leveled…finally.
To sum it all up, removing/installing the mower deck is quick & easy, removing/sharpening/reinstalling the blades is quick & easy, and leveling the deck at the end of the job is a little bit more of a pain than the other aspects and takes a little bit longer than it should (In my opinion). All in all, I’ll probably continue to remove the deck to get to the blades, although if I can find my car ramps I may give them a try to see if I can do the job quicker and easier that way.
-Matt
Thnaks fro the info, I have one of htese mowers and will probably change my bl;ades with the ramp method as a result of reading this blog. Thanks again
Pete in Annapolis, MD.
I use an air impact wrench (got mine from Home Depot) with an 18mm impact socket to get the nuts off. No need to wedge the blades.
The stubby air impact wrench is only about 7 inches long, including a shallow socket, so you don’t need to raise the mower very much to get access.
Hope this helps someone.