Kreg Precision Trak & Stop System Review
Kreg Precision Trak & Stop System
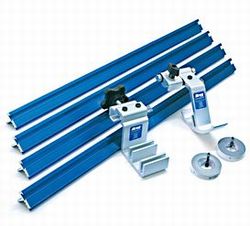 I’ve almost completed my new built-in miter saw station which includes an adjustable fence system on both the left and right sides of the saw. I built the fence system out of some aluminum angle, 1×3 pine fence and the Kreg Precision Trak & Stop System.
One of the more important tasks at the miter saw is being able to efficiently cut several pieces the same exact length. This comes in very handy when building furniture, cabinets and much more. That’s where Kreg’s Precision Trak & Stop System comes into play. The system allows you to quickly and accurately set saw stops for your material.
The folks at Kreg Tools were kind enough to send us this kit so we could outfit the new shop. Below are my thoughts on it and how we used it to set up the shop.
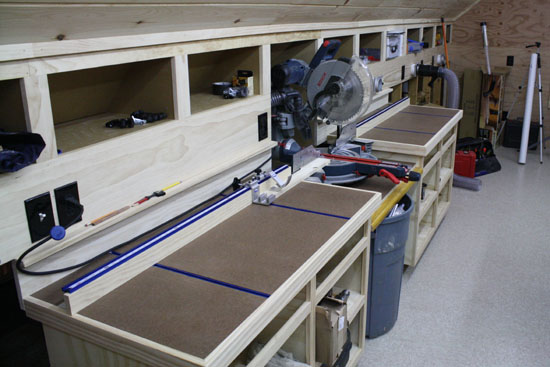
My Miter Saw Fence Setup
In my new shop I’ve set up a pretty nice miter saw bench. The bench has 66″ to either side of the saw blade allowing me to rest 8′ stock lengths on the bench without them falling off. The bench on either side of the saw is also an all purpose bench so I needed an adjustable fence that I could easily remove.
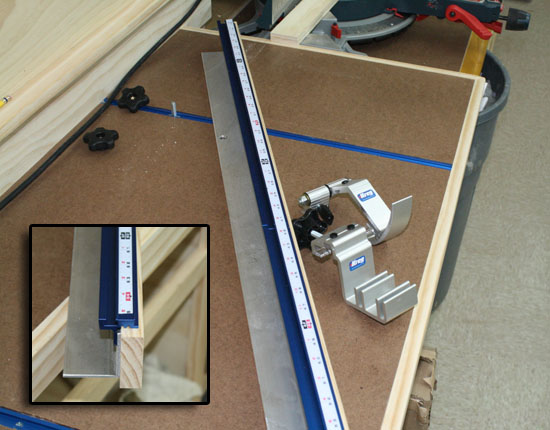
I’ve created a custom fence for each side of the bench. The fence is very simple to build and uses 1/8″ thick aluminum 2×2 angle, a 1×3 (cut down to 2-1/4″ tall) fence, and the Kreg Precision Trak & Stop System. The fences are then secured to the bench top using Rockler Universal T-Track. These fences are really light, easy to adjust and easy to store!
Overall Impression
The Kreg Precision Trak & Stop System is made of really good quality materials and it works great. This system will definitely take your miter saw bench to the next level! Below are my thoughts on this really useful shop accessory.
Pros:
- The top rails which mount to your fence are made of really nice aluminum that have a nice blue factory finish.
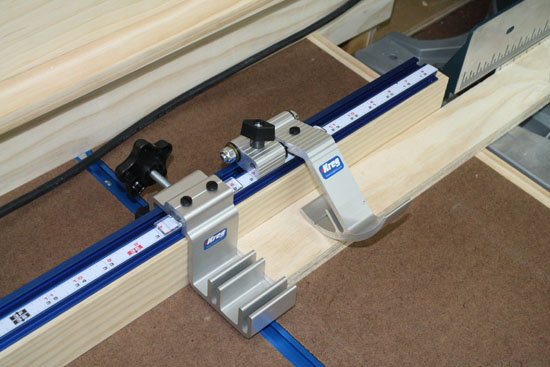
- Both of the stops are also made from good quality aluminum. Both stops slide very well over the rails and provide extremely accurate repetitive cuts.
- The assembly directions are very easy to follow.
- The adhesive measuring tape is a good quality metal tape that should last a very long time.
Cons:
- You do have to drill your own holes through the track for securing it to the fence with supplied wood screws. I would prefer having the holes pre-drilled like many of the T-Tracks available on the market.
- The set screws for the measurement guides are plastic. While the screws don’t really get much use or loading I fear they may strip over time as I adjust them.
I’m extremely happy with the Kreg Precision Trak & Stop System. Built from high quality materials it offers wood workers or any shop worker a precise way of quickly and efficiently cutting materials to the same length over and over again. I also find it very useful for single cuts as it eliminates the need for a tape measure if accurately calibrated.
If you’re looking to build a similar system in your shop I highly recommend this system. Priced around $130 depending on where you buy it I think it’s a great value. If you’d like to buy it we’ve included the following link over at Amazon:







Todd- Great review. You did a real nice job showing this product in a useful, real shop project. Not many tool review sites can offer that! Well done sir.
Thanks Rob. It’s a great product and a fine addition to the new shop.
Well written review and I have to say that you done an amazingly tidy job on the bench….I was thinking I might have you make me one! very solid work.
Cheers.
Really like your idea regarding the Kreg Trak system and the Rockler T track. Have a couple of question regarding your installation of the Rockler track.
It looks like you edge your work surface with solid wood. How do you slip the t-bolts or hex nuts into the track with the wood covering the front opening of the track?
When you reinstall your fence for the miter saw, does the fence go back to the exact point it was when you removed it?
James – Thanks for stopping by. You bring up an excellent question about the T-Bolts. I hadn’t thought about that because I put the T-Bolts for the fence in the track when I screwed the track in. I will likely remove the track and cut them back 3/4″ so I can slip in additional bolts for jigs and hold downs.
No on the fence. This is because I actually slide my saw forward when I’m doing compound miter cuts. When I’m not the saw is further back leaving me more room in the shop. So I need to use my long straight edge and set the fence anytime I move it. Frankly it only takes a couple minutes to set up.
I like the tables, which do appear to hold your stock well at the same height as your mitre saw, and I like the cabinet idea for holding all the equipment, tools, bits and assorted paraphernalia which invariably accumulates amongst tool fanatics.
My question is this. Can your mitre saw fully go to 45 degrees and beyond, on both sides? It appears that your table tops won’t allow that, at least by the photos.
Yes it can. The way it’s designed I can slide the miter saw forward (and the fences on either side) because of the T-Tracks in the table tops. This allows me a great bit of flexibility.
Great and timely article. I received the Kreg Track and Stop system for Christmas and recently decided to replace my old “chop saw” with the same Bosch articulating arm saw you have shown here as well. I think I am going to incorporate your use of the Rockler T guides and the idea around the adjustable fence. Two questions for you though…
1 – I notice the saw sits between/on some angle brackets that allow you to slide it forward/back and yet stay true to the fence table. How do you secure it though when you have placed it in the desired location to keep it from sliding back and forth while pulling cuts?
2 – table height. I know the ideal varies depending height of the user, but was curious if you went “Stock” height in the cabinets and whether the saw is lower (and how much so) than that height (given I am planning on purchasing the Bosch as well).
Lastly… Any google sketchups of the plans for this bench that might be shared?
Robaer – Glad you liked the set-up. Below are my responses.
1. I actually have T-Track blow the miter saw as well. I slide it into place then use T-Bolts and knobs to secure it.
2. I actually built mine so the top of bench matches exactly the height of my table saw. This allows me to rest large work pieces across both surfaces if need be.
I haven’t built any sketchup models yet…but I do plan to in the future.
great… and thanks!
Todd, great write up! This is exactly what I’m in the middle of doing in my garage shop.
Can you tell me about your dust collection on this bench? Looks like you have ports just behind the fence as well as behind the miter.
Lou,
If you check out this page on the site you’ll see my entire shop including links to the dust collection system.
http://www.homeconstructionimprovement.com/workshop/
Good luck.
Todd
Nice job. What size T-bolts did you use?
You can use several sizes. I used 1/4″ hex, but you can also use 1/4″ T-bolts and 5/16″ T-bolts. See more here: https://www.homeconstructionimprovement.com/rockler-universal-t-track-kit-review/
Just curious if you offer plans for the miter station?
I don’t have any sorry.