Kitchen Backsplash – How To Tile A Backsplash
How To Tile A Kitchen Backsplash
Kitchen backsplashes can be as simple as a 6 inch high piece of your countertop and as complex as an intricate tile design. Installing a kitchen backsplash is a DIY project that most people can do with a little planning and elbow grease. We recently installed a tile backsplash in our kitchen and the following information will help you understand how do it yourself and save money.
Backsplash Materials
Kitchen backsplashes come in a variety of materials today to match almost any design and decor. A kitchen backsplash offers you the chance to be very creative with colors, materials, and accent pieces. A well designed backsplash can turn an ordinary kitchen into a showroom that all your friends and family with envy.
Selecting backsplash materials is the first step in the design process. When I say the skies the limit I really do mean that. Today you can buy tile in almost any type of material from natural stones, ceramic, glass, metal and even plastic! The best place to start your selection process is at your local building supply store or tile store.
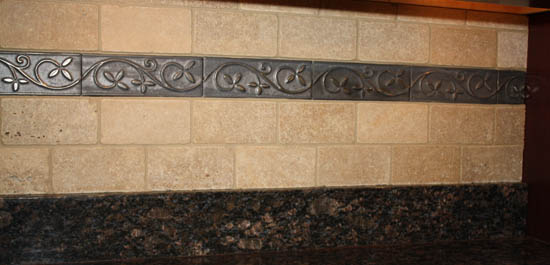
For our kitchen backsplash we chose to use a tumbled marble tile along with a ceramic decorative accent tile. The colors we chose matched the rest of the kitchen nicely as the adjoining wall paint is is a tan color and the accent tiles pick up on some of the dark gray colors int he granite.
Backsplash Design & Layout
Once you’ve decided on the type of materials to use for your new kitchen backsplash then it’s time to design the layout. Time spent laying out the tile design will make the difference between an elegant complimentary feature and an amateurish looking mistake. Unless you live in a perfect world your kitchen backsplash area will include lots of obstacles like electrical outlets, cabinetry, appliances and even windows.
Read our previous article on how to design a kitchen backsplash for tips and guidance on designing your backsplash. Be prepared to create a scale drawing or sketch of your design to ensure an accurate design. The sketch also will help you purchase sufficient materials and avoid costly mistakes.
Choosing Adhesives
In addition to choosing a backsplash material you’ll also need to choose an adhesive for those materials. Typically most backsplash tiles are adhered to the wall using either mastic or thinset. The debate of Mastic Vs Thinset is worth talking about before you begin installing your new backsplash. Backsplashes are one of the few applications where we think mastic is an acceptable product. In fact, mastic will make your job much easier and quicker. If you’re backsplash will get wet often then you should opt for thinset as it’s a waterproof product.
How To Install Backsplash Tiles
Now that you’ve selected the materials and created a design it’s time to install the backsplash tiles. Installing backsplash tiles is pretty easy to do if you followed all the previous steps. The key to a successful installation is being prepared and taking your time. There is no reason at all to feel as though you must finish this type of project in one day. In fact, we did this project over the course of several days. It’s better to slow down and take your time vs rushing and being unhappy with a shoddy looking backsplash.
The first step involves adhering the tiles to the wall. You can learn all about this step in our detailed article on how to install kitchen backsplash tiles. This step involves cutting tiles, attaching them to the wall and following your design. The tiles are set with spaces between them for the next step of grouting the joints.
How To Grout Backsplash Tiles
Once the tiles have been installed and the mastic or thinset have cured you’ll need to fill the joints with grout. You’ll need to select a grout type, sanded, unsanded, premixed or dry. All of this is covered in our article on how to grout backsplash tiles. Grouting the tiles is the messiest part of the job and one that most people dislike. Frankly I don’t think it’s that bad so long as you just tackle small portions at once.
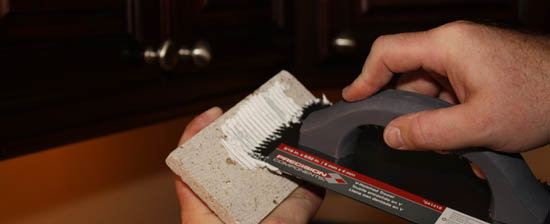
Once the grout is inserted into the joints you need to remove the excess by repeatedly washing the tiles with a wet sponge. In the article on how to grout backsplash tiles we show a time saving trick to apply the grout with a pastry bag. Grouting the tiles is also a step that hides small little imperfections in your tile installation. Once the grouting is finished the job is nearly complete.
Finishing Steps
Once you’ve cleaned up all the messes and straightened out your back it’s time to add some finishing touches.
For our project we used a premixed grout with a sealer additive. However, if you use a traditional grout this would be the time to install a grout sealer to protect the grout lines from stains. Grout and tile sealers are very easy to install and most of them are VOC compliant and easy on the lungs. Most are simply wiped on with a clean cloth and then left to dry.
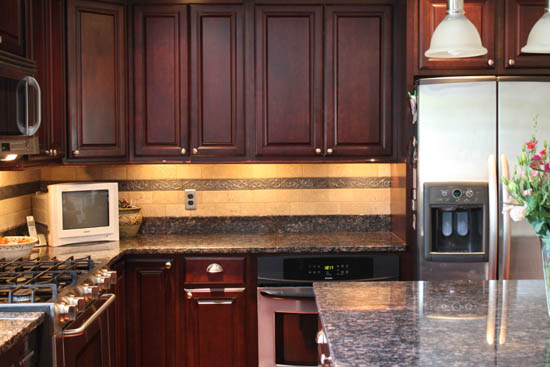
For our project we also decided to upgrade the electrical outlets and switches to more closely match the kitchen. Our old outlets and switches were white with white cover plates. As you can see above we replaced the outlets and switches with black and also replaced the covers with stainless steel to match the appliances. These little details certainly helped bring the final design together for a beautiful look.
As you can see installing a kitchen backsplash is fairly straightforward and a great DIY project.


This is really amazing. The cabinets and the bricks are well designed. I like the look of this kitchen. Great job!
The kitchen looks great! Cabinets and tiles go together nicely. Being in the business, we also find mastic a good adhesive for the back splash but you would be surprised how many clients don’t think to check with the contractor if what they are using is waterproof. A very good point to bring up and something homeowners should double check, just to be sure. Having a good layout ahead of time is also important so the homeowner can clearly express the vision to the contractor. Thanks for the helpful tips and educating homeowners.
Chrissy :)
~See The Difference~
HomeImprovementsDoneRight
I think one of the biggest things most people do not stress enough when doing a kitchen backsplash is sealing the tile. Especially if you’re using natural stone, and even more importantly around stoves and microwaves.
Even if you’re using a full slate or tiling, sealing is one of the most important steps and needs to be done yearly. The grease can do alot of damage to your backsplash if you do not take care of it.
You used mastic to adhere your tumbled marble tiles (travertine?). When I was picking up my travertine tile from the store, they said not to use mastic as it will stain the marble, did you notice any staining?
Our tiles are relatively thin, but due to the small size of our kitchen and the number of different cuts I will have to make to the tile mosaic, I’m afraid thinset or mortar will dry out too quickly. I’m thinking of trying mastic, but wanted a second opinion.
Any thoughts?
I tested the mastic on a piece before beginning. We haven’t had any trouble at all.
hi todd i purchased thai same border bronze tile you used… i bo ught it a while ago on clearance and need a few more and cant seem to find it or the name /brand? hoping you can help me with this? please send to amra284red325@yahoo.com if you can help … Thanks And you do great work and are very helpful Terry
Terry – It was so long ago that I do not have that information either. I purchased mine at The Home Depot. Maybe they can help you find a source. Good luck.
Todd:
This series is the most informative and beneficial on the web. Thanks for your efforts in helping us novice DIYers.
I am planning to install my first ever backslash and am hoping you wouldn’t mind answering a few questions.
I will be installing 4×4 honed travertine tiles (slightly smooth/shiny surface) on the diagonal. I plan on back-buttering using mastic. Do you foresee any problems with this method? The area will not be in contact with a water source (sink). I intended to use a sanded grout. Do you think this might be a problem with scratching the tiles? Although I like your idea of using a pastry bag, it seems like it would take a lot more time than using a float. I am concerned that using a putty knife to work the grout (if using a pastry bag) might also scratch the tiles. Perhaps I am being naive.
Finally, I will be using accent pencil moldings to finish the edging and rail moldings to create a dimensional frame above the cook top. Do you foresee any problems by not leaving a grout line where the joints of the miters cuts and butts of these moldings meet? Any suggestions/tips would be greatly appreciated.
Kyle – Thanks for the nice compliment.
So most tile setters that I know would use a sanded grout with “honed” travertine if the grout line is 1/8″ or greater. Most people only stay away from sanded when the tile is polished.
The pastry bag was good for my tiles because I didn’t want to grout in all the natural holes/voids on the surface of my tiles. Those tiles were so rough that a regular grout float would have made an impossible mess. I’d use a regular grout float for your application.
Tile miters are a funny thing. I’ve seen them both ways and after years of seeing that detail I like the grouted ones. Just my 2 cents.
I sure hope that you sign up for my FREE Newsletter so you can continue to get great home improvement advice.
Todd:
If you would indulge me one more question. I am laying out and cutting the tiles on a template prior to installation. I’ve come to an inside corner, and I am not sure what to do. Should one tile butt against the wall and the tile on the opposite 90 degree wall start one spacer off this tile? Or, should a spacer be put in the the corner and the tiles on the opposite walls set against this spacer, with the grout filling the void in the corner? The tiles are on the diagonal and I am trying to keep the design through the corner.
Thanks again!
Kyle
Inside corners are tough for diagonal patterns. Really good tile guys set their design so the corner tiles end up symmetrical on both sides. In other words if you end with a 1/3 tile then start with a 1/3 tile. The best is obviously when you get to the corner and you have a full 1/2 tile. I’d run one tight into the corner then set the next one one tile space off the corner. You want to keep the grout to a minimum yet keep the grout line the same width.
Hope that helps.
My husband and I just installed a stone and glass mosaic backsplash in our Kitchen. We’ve finished applying the grout and let it set and dry. Now our issue is cleaning the grout off the tile. The grout comes off clean from the glass but the stone, not so much. Is there any tips you can give to clean the grout off the stone easier and faster?
The best tip is too late. Grout should be cleaned immediately after-wood so the grout doesn’t stick to the glass tiles.
I know that, I just wanted to know if you knew if there was any other way to help remove most of the grout off the tile, since Im rubbing one by one off each square.
They sell some grout remover at the hardware store. it’s suppose to help remove it after it dries. Ask at your local hardware store.
Thanks for the very informative video. I am glad that someone also explains and shows the little things like surface preperation and back buttering.I am planning on tackling me backsplash this spring, so the videos and explanations were extremely helpful.
Thanks again!!!!
Many thanks for the very helpful article. As someone who has tried and failed at DIY tile work in the past, would suggest folks take a class on using a tile saw prior to starting on this sort of project. Most large home center chains offer these classes, which include some hands-on practice. They also offer hands-on how to tile workshops, which I would also recommend. Any free practice and guidance will save DIY-ers time and money down the road and result in a better-finished product.
Wonderful post Todd! It’s great to see a DIY blog that dives a little deeper than the usual ‘top 10’ lists.
Looks great! Just curious, how did you finish the edge of the top tile that appears to be exposed in between the cabinet and the window? I have a similar layout and was thinking about using 1/4 round wood trim, but I don’t see anything like that on your installation (can’t zoom in close enough on the photos). Thanks
The top edge that’s exposed is a full tile, not cut. Nothing more than that.
I am about to install a backsplash that is mesh-mounted Small glass pieces. They look like tightly packed broken shards although they are polished and rounded individually. My local tile store told me to use mastic, but I see lots of websites saying only Thinset for glass. What are your thoughts on this?
I’d only use thinset as well.
Two years ago a tile professional installed our backsplash of 3X6 travertine tile. It is a beautiful job that we have really enjoyed, HOWEVER, just this evening I noticed some cracks in the job, felt around them and found that the tile has loosened and is now falling off the wall. He used Mastic instead of thinset. We have an extensive and intricate backsplash that needs to be redone. I hope it will come down without breaking the tiles. It was glued to a plywood wall. No water has been exposed to the tile as it is coming down about 2 feet above the sink. Why do you suppose this would happen and what can I do to insure it doesn’t happen again? Thanks in advance for your time.