Stairs Construction – How To Build
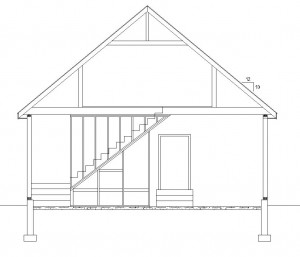
Staircase Design / Drawing
We built our new garage with attic trusses so I could have a space for a workshop. In order to get to that space I need to build a staircase. As you can see from the sketch my plan is to build a staircase that has a short run to a landing followed by a 90 degree turn up the remaining distance. Before you start building a staircase it’s important to gather some information. You’ll need the following:
- Overall height from the finished floor to the finished floor above.
- Overall horizontal distance you have available to “run” out the stairs.
- Minimum rise and run per local and state building codes.
Cutting Stair Stringers
Building a set of stairs looks much harder than it actually is. I’d recommend this Basic Stairbuilding Book if you’re interested in learning more about building staircases. The most important tool you’ll need for this is a framing square.
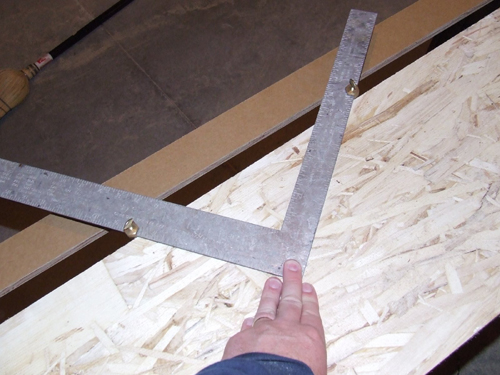
To make things easier I suggest buying a pair of brass stair gauge clamps. The gauges clamp onto the framing square so you can repeatedly mark out the same rise and run for the stairs. Each building code has different requirements on the maximum rise and run that a stair can have.
For my staircase I’m trying to have a maximum rise between 7.5 and 7.75 inches and a run of 10 inches. I measured the distance from the concrete floor up to the finished floor of my workshop to get the total rise required. In my case the total height was 129.625 inches. Therefore I end up with 17 risers at 7.625 inches. In the photo above I set the run to 10 inches and the rise to 7.625 inches in order to mark out the stringers.
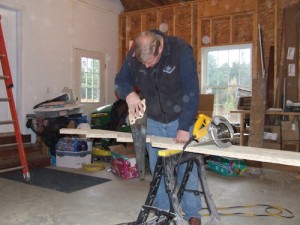
If you’d like a free stair calculator to easily calculate the rise and run for any staircase then sign up for my feed down below. Once you sign up there is a link at the bottom of each feed you receive with the free excel spreadsheet for calculating stair stringers. You can read more about that stair calculator .
Stair Materials
Stringers
I used 1 1/4″ x 11 7/8″ TimberStrand LSL (Laminated Strand Lumber) for the stringers. The LSL’s are great for stair stringers because the strands actually help prevent cracking at the intersecting cuts at the corner of the riser and tread. Use a circular saw to cut along the lines making sure not to cut past the 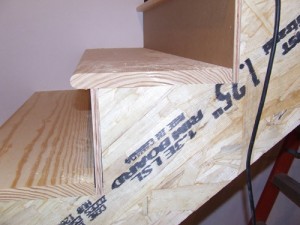 intersection. Then you can use a hand saw to finish the cut.
After you cut out one stringer you can use it to trace the remaining stringers. For my staircase I had to create two different sets of stringers. One for the first run from the floor to the landing and a second set from the landing to the workshop.
Risers
The next step is to cut risers and treads. I used 1/2″ MDO plywood for the risers and 5/4 southern yellow pine treads that already had a bull nose milled on them. I install the risers first, nailing them with finish nails to the stringers, then I screw the treads to the stringers.
I also like to put a screw in the back of the riser into the tread. This process creates a strong staircase and it’s really not that hard to do once you get the hang of it.
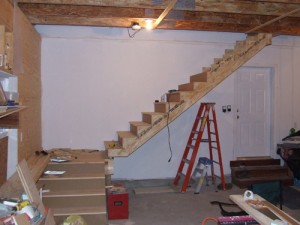 Finished Staircase Framing
As you can see from the photos building a staircase isn’t really that hard. You just need to take your time, plan it out and do some research on local codes. Once I get the walls framed and finish this project I’ll post more photos and information.
![]() RSS Feed
RSS Feed
![]() Email Subscription
Email Subscription
Building A Staircase
How To Build Stairs
Home Improvement
Home Improvement Blog







Thanks! this information was very helpful
Great info. Nice post, keep up the good work. Cant wait to see more pictures.
Fantastic post. Just the thought of building stairs can be very daunting. I’m going to add a link to your post on my site: http://www.justshedstuff.com
Thanks
If you want to make your life easier drawing out these stairs, I just got a program from Shalla.Net for a project out on the deck.
I’m not a carpenter by any means whatsoever and following the instructions makes this thing fool-proof….heavy on the fool (talking about myself here):)
I have tried 2 links on this site neither worked. Both were links refering to the staircase calculator
@ Roy – You need to follow the link to become a RSS subscriber. Once you sign up there will be a link at the bottom of the feeds with the link to the calculator.
Do you have any suggestions on framing out a staircase?
@ Scott – Not sure what you’re asking. This post goes over how you build stairs. Are you talking about framing walls on either side of the stairs?
I’m an architecture student, I need to have a spiral staircase out of cardboard to fit into my cardboard model.
How do I construct a spiral staircase?
@ Jen – I’ve never built one so I’d be guessing. I think you need to get your hands on a building code from your area and they probably address spirals directly with information on rise, run and radius. Good luck!
How timely! All we have left to do before submitting our plans to the city is to get the stair design and lot contour. You have some great detail on this site. Thanks!
This is going to sound silly, but didn’t you say you also use this same board for painting murals etc on? Im an artist and am curious about this as i have just been asked to do a mural for some friends of mine, i want to do a good job, and need to attach it to a timber fence, as the timber fence is not suitable. Or can you recomend something else? please help :-)Thanks
@ Cea Breize – You should buy plywood that is made specifically for outdoor signs. Check with your local lumber yard and tell them what you’re doing. They do sell an exterior grade MDO product that would work great.
I do various home-improvement’s & renovation’s, including landscape/hardscape. I am just getting into stair building/repair/renovation/design, and this site is my number one go-to guy for all my staircase info, thank’s Todd!!! By the way, are hollow or solid newel’s better? I found out people historicaly put plans in the hollow newels and capped them. Cool huh?
Planning to build our retirement home in the next two years. Have rough plans but still have a lot of planning to do.
I see your stairs are not permitted. I can tell from the finished stairs, they are not built to any code that I am aware of. Your second set of stringers are improperly cut and installed. The stairs should either fall on top of the landing or hung off of the landing using pressure blocks and (or) hangers. The top of the staircase should be head off with minimum 3/4″ plywood, screwed glued and tattooed, if they are not at the same elevation as the second floor. Just an observation. Have a nice day.
Richard – Thanks for stopping by. Your comments are right on, however your observation is lacking. I don’t fault you as the photos are hard to see. The stairs actually do land on TOP of the landing. The top of the stairs actually DO hang off 3/4″ plywood that is in fact screwed and glued to the stringers above. Thanks for sharing your knowledge with everyone.
Todd,
How wide is your staircase? Does it just go up between two floor joists?
I was wanting to do this in my garage, but not sure if going in between two floor joists would be a wide enough staircase, and also not sure how to go about cutting and supporting floor joists to make a wider opening.
John – Mine is 4 feet wide and the trusses were purposely designed for this application. You should never cut/modify trusses or ceiling joists without fully understanding the load condition. In other words, you most likely should consult a structural engineer before proceeding.
Thanks for the info on the best material to use for stringers. I am about to do this staircase tomorrow so any hints are great.